

Blog post originally published on July 24, 2017. By Christopher Kark, contributor.
Peruse Pinterest or Instagram long enough and you’re bound to find stunning photos of food. Once limited to magazines and cookbooks, food photography has burgeoned ever since websites have been able to display high-resolution photos. Nowadays, food photographers spend their days staging freshly cooked dishes amidst thematic props. It’s one part photography, one part stage design, and one part post-production. Aficionados make use of professional-grade equipment that costs a small fortune and takes a good deal of practice to use properly. With such high standards, what are the rest of us to do?
Fortunately, it doesn’t take a $10,000 DSLR or studio equipment to take beautiful photos of your food-or, for members of the Teuko community, of lunchboxes on the go. All that’s needed is a smartphone with a camera and familiarity with the basics of photographing images up close. Let’s get started by reviewing five key principles in food photography:
1. Light
2. Proximity
3. Lines-Angles
4. Styling
5. Editing
Light
Translated literally, photography means “writing with light.” It’s no surprise that light is the decisive factor in taking photos. When photographing food, indirect natural light is paramount. An image of food should tantalize viewers, whetting their appetites. Just as food should be natural, so should light.

A lunchbox illuminated by natural light from a nearby window. (Source: Teuko.com)
Beware: like a camera flash, too much direct natural light will wash out an image. Avoid excessive light by deactivating your flash and shooting in an area bathed in indirect natural light, ideally through multiple windows. Unless you’re looking to photograph a candle-lit dinner, food photography is best done in daylight.
Proximity
Unlike landscape photos, at times stretching miles into the distance, food is front and center. Some photographers use macro lenses, a features also available most point-and-shoot cameras and automated on smartphones, whose cameras range from eight to 12 megapixels. Since food isn’t photographed a distance, far weaker cameras can still take beautiful pictures of food. Nearby objects occupy more pixels than a lone tree on the horizon. That’s probably why food photography has become so popular, not requiring telescopic lenses or tiny apertures.

A close-up of three lunchboxes, the first of which appears in focus. (Source: Pixelbay – CC0)
How close you choose to photograph food depends on what you’re looking to highlight. Images of food taken anywhere from a few inches to several feet away are standard and, unless magnified, won’t pixelate on a screen. Lunch boxes appear best when photographed at a sufficient distance to reveal a few inches of surroundings. Depending on the size of your lunchbox, distance can range between one and four feet. Close-ups call attention to the natural beauty of the food and contrasts between different items served; photos taken at a greater distance can highlight the interplay between the lunchbox and its surroundings.
Lines and Angles
The best designs abide by the so-called “Rule of Thirds,” a grid system split into nine sections. Our eyes naturally gravitate towards lines and intersections on the grid, and with it, our attention. Images with an object in the center don’t call attention to one part over another. Everything is in focus and presumably important, which is generally the case of photos taken directly above (at a 90-degree angle) an object. This is the standard angle for snapping photos of a lunchbox, its contents in full display from above.

A photo of Korean lunch boxes framed using the Rule of Thirds. (Source: Pixelbay CC0)
If you’re feeling bold, though, you can experiment with other angles. Aim your smartphone at a 45-degree angle and you’ll focus on whatever appears in the front sections of the lunchbox. Transparent containers, such as glass containers, allow for cross-section shots that showcase a lunchbox’s contents from a 90-degree horizontal angle.
Styling
Food looks best in natural settings. This is true of light, as discussed above, and of surrounding objects. Whenever possible, take photos your lunchbox placed on a natural surface (e.g., wood) and exclude thematically unrelated objects (e.g., paper, toys, etc.). A surefire solution is to clear everything from the area near the lunchbox, leaving only the ingredients and utensils involved in packing it. In other words, the photo should at least feature the lunchbox and food it contains, but can also include supplemental items, such as utensils, napkins, ice packs, and the bag used to carry it.
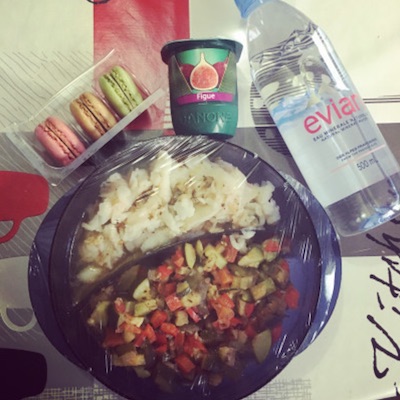
A packed lunch flanked by cookies, yogurt, and a bottle of water. (Source: Teuko.com)
Editing
Most smartphones and point-and-shoot cameras include image editing tools that can adjust an image automatically. These generally help, but your best bet is to crop and adjust manually the brightness, contrast, and saturation in the photos app on your phone. If you take and edit a lot of photos and are willing to spend time (and money) perfecting their appearance, you might consider investing in an editing app—there are thousands available for iOS and Android devices.
Bringing It All Together
Food photography is more popular than it’s ever been, and for good reason: everyone has to eat. If you’re hungering for more tips and tricks, contact us for a list of resources. Do you have another trick you use and you would like to share with us? Send us an email.


One thought on “Lunchbox Photography for the Time-Strapped”